Over the weekend I attended a Kati Reeder Meek weaving workshop called
Lustrous Linens - Weaving Linens with Success. The workshop was hosted by
The Waterford Weavers Guild. Kati is the author of two books, Warp with a Trapeze and Dance with your Loom (using Live-Weight-Tensioned Warps), and "
Reflections from a Flaxen Past".
Kati Reeder Meek taught us how to use a warping trapeze along with gravity and applied vibration to beam an evenly tensioned warp and to use live-weight tension to weave without stopping and retensioning the warp. In addition, Kati shared many of her best practices. (Click on any picture to enlarge.)

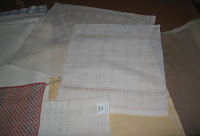
Linen in various stages.

Some of Kati's woven linen samples.

Warping back to front using a trapeze. You can make your own trapeze (instructions in Kati's book) or you can purchase one from
Purrington Loom Company. The trapeze is temporarily attached to the loom, lease sticks protecting the cross are attached, the end loops of the warp will be attached to the warp rod, the rattle is tied to the back beam, and the weights are then tied to the warp. We are now ready to spread out the threads in the rattle.

Stiff paper is inserted to separate the layers as we crank the warp on.

Beaming on. During this phase the warp is spanked to vibrate the warp and even out tension.

As the warp is cranked on, the weights rise to the top and need to be repositioned.

Beaming on finished. The trapeze is removed.

Threading the heddles. Kati believes in finding a comfortable position for seeing and reaching the heddles. This may mean your loom might need to be put up on blocks, tilted forward, or the shafts lifted. Position yourself as close to the heddles as possible.

Sleying the reed with an automatic denter or reed hopper. The automatic reed hopper "walks" from dent to dent without ever leaving the reed. You can view a video clip of an auto-denter in use
here. Kati uses the auto-denter a little differently but you will get the idea.

Using the "click method". Kati attaches the warp threads to the cloth rod from the outside to the inside. She will advance the cloth ratchet one click every so often. The warp will be at very high tension at the end. The tension will backed off before weaving begins.

Once the loom is fully dressed weights will be used in place of the braking system. Live-weight tension uses gravity to get the job done. The larger milk jug tension the warp by pulling down and the smaller water bottle provides a counterweight. The loom's brake is disengaged. As the warp is advanced the milk jug will rise until the water bottle touches the floor. Then the cord wrapped around the warp beam relaxes and the milk jug slips down until friction is restored. This is self-adjusting so there is no need to deal with the friction brake and readjusting the tension with each advance of the warp. Your warp will remain at the exact same tension.

 The trapeze is attached to the loom, the rattle is in place and the warp is attached to the rod.
 The warp goes up and over the PVC pipe.
 The weights are attached to the other end.
  Once the warp is cranked on the trapeze is removed and the heddles are threaded.
 Sleying the reed using an auto-denter.
 Time to weave. This tartan is called Sutherland District scarf half sett.


